In an effort to streamline all of our studio happenings, we decided to start this blog. Here you will find instructor bios, studio news, programming udpates, student spotlights, posts and videos of our crazy team, and more. We hope you enjoy. Let us know what you think 🙂 ** For easier navigation, use the category links under the Blog button.

PIANO
Hey! I’m Adam Butcher. I began taking piano lessons when I was in kindergarten and almost quit when I was 9 (but I’m glad I didn’t!). I earned my RCM Grade 8 when I was 16 and have loved music all my life. I enjoy playing the piano for services at my church and for wedding services for friends and relations.
While I mainly play the piano, I also play the trombone and taught myself (and a number of students) how to play the ukulele while teaching elementary school music. I am currently a classroom teacher in Hagersville and appreciate the opportunity to share my love of music with the students at Lupton Street Studios.
I love helping students use the arts to express themselves and make connections to the world around them through the songs that they play.
As we are enjoying the last weeks of summer, with its more relaxed schedule, we are starting to hear all those “Back To School” commercials. We are already feeling a bit nostalgic for all the promises the summer season held and for the good times we’ve enjoyed, as we are planning to go back to our regular fall schedule.

VOCAL, BEGINNER PIANO
Kori is passionate about creative self-expression, whether that be through a song, piece of art, poem or journal entry. A graduate of McMaster University and the Mohawk College applied music program, her 20+ year career has centred on performing, writing, recording and teaching music.
In 2020 she became a certified Expressive Arts Practitioner in an effort to study and learn how the creative art process can be applied to wellness and self-care practices. She is happy to be joining Lupton Street Studios as a music teacher, visual art and workshop facilitator. You can learn more about her at www.koripop.com

When was it already…? Oh yeah. Summer of 2020. In the midst of a global pandemic. I was at home, without a job, wondering what would happen with my life. Then I saw an ad on Facebook for a music studio seeking a piano teacher.
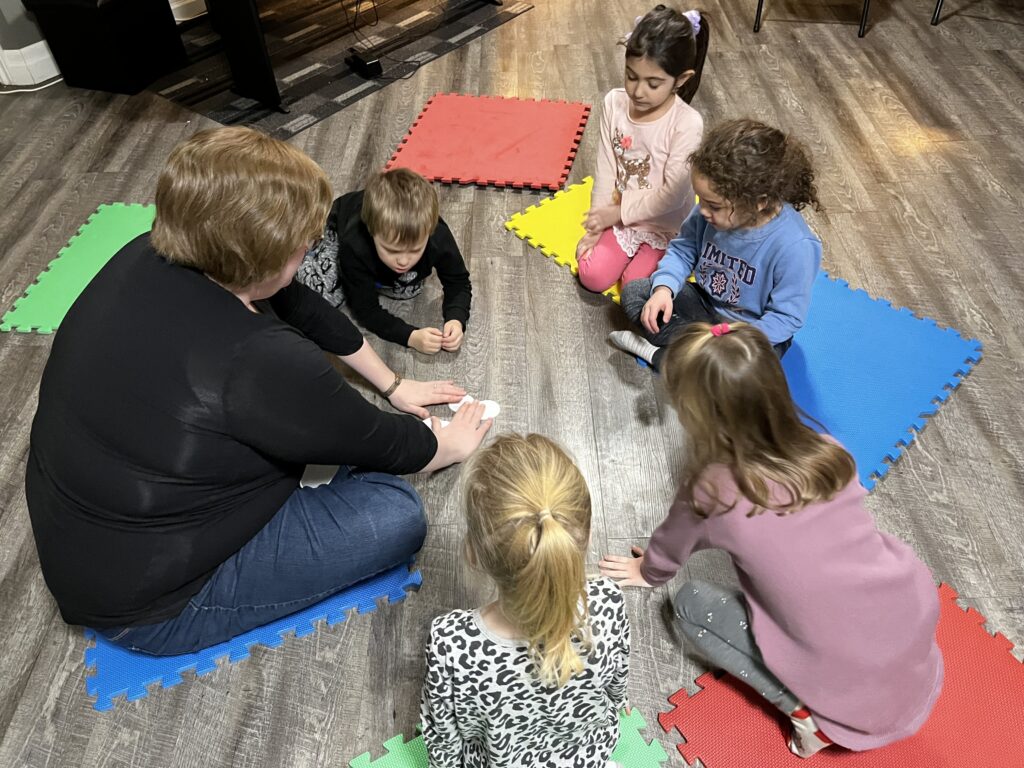
Recital 2023: Celebrating Growth, Showcasing Talent, Cheering For Everyone!
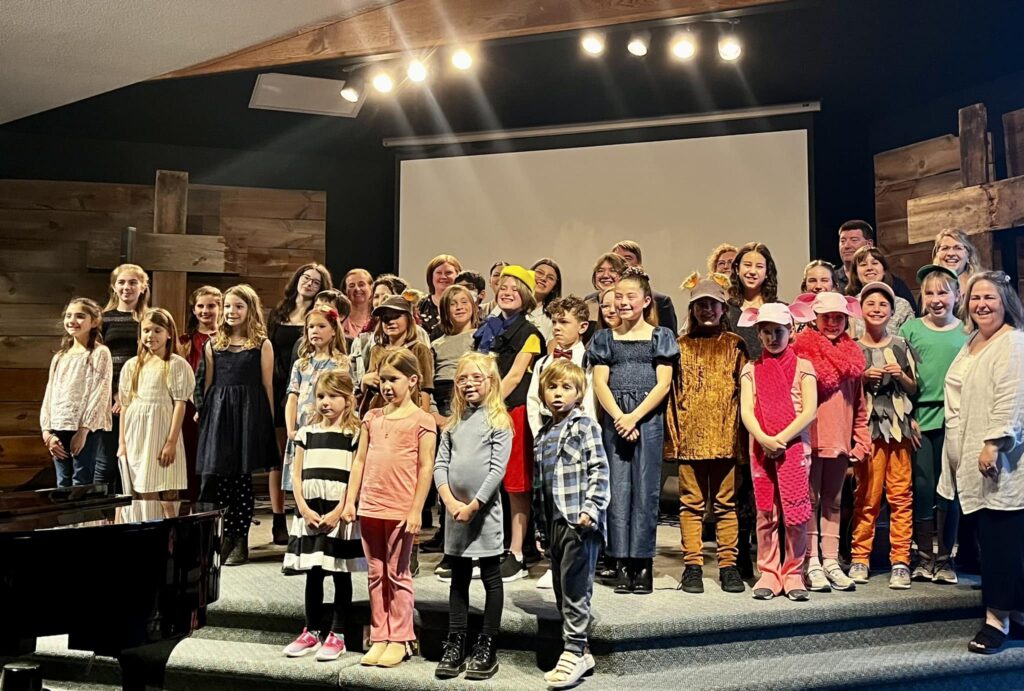
May 5th, 6:45pm: a huge crowd gathered at the Highway Church in Hagersville. The sanctuary is packed. Nervous children wearing their Sunday best are carrying piano books. Parents are beaming with pride, keeping their camera ready to record their progeny’s performance. Some performers are wearing pig or bear costumes, obviously ready for a musical theatre number. Teachers go around, talking to one student, giving a thumb’s up to another, encouraging and reassuring everyone.
We are ready to begin the annual Lupton Street Studios Recital!
Summers are always such a special time! Even if you are still working, the rhythm of the day seem different. The extra daylight gives us the impression that we have so much more time to do fun things!
Trying a new activity during the summer feels more like an adventure, a treat, than a chore. Feels like there’s no pressure, right? No serious agenda to follow. We’re just trying something!

Aren’t these little bunny candy containers adorable! We were inspired by this page and created our slightly different version of them.
It’s Monday night at Lupton Street Studios and a bunch of 4 and 5 year olds are laughing, singing and having fun in our downstairs room. Ms Carrie is teaching them a new rhythmic game or a new song. It’s Mini Musical Theatre night!
Teacher Carrie shares with us:
“Teaching mini musical theatre is a highlight in my week! We typically start off with a warm up game that incorporates an aspect of rhythm, singing, or acting and then work on a few action songs. We rotate through some more familiar games like musical chairs, Simon says, and charades. I also add in activities that focus on rhythm, acting, and even prop making. I love seeing the kids creativity come out and have enjoyed seeing their personalities grow and shine more each week!”
Through all these games and activities, kids get familiar with some simple basic elements of singing and performing. They learn to work together as a team, in harmony. This creates a foundation upon which they’ll be able to build once they get older, as they progress to more advance programs.
You can see how much fun they have in this little video. Check it out, maybe you know a little one who would enjoy this activity! Even at a young age, kids can express their musical side!
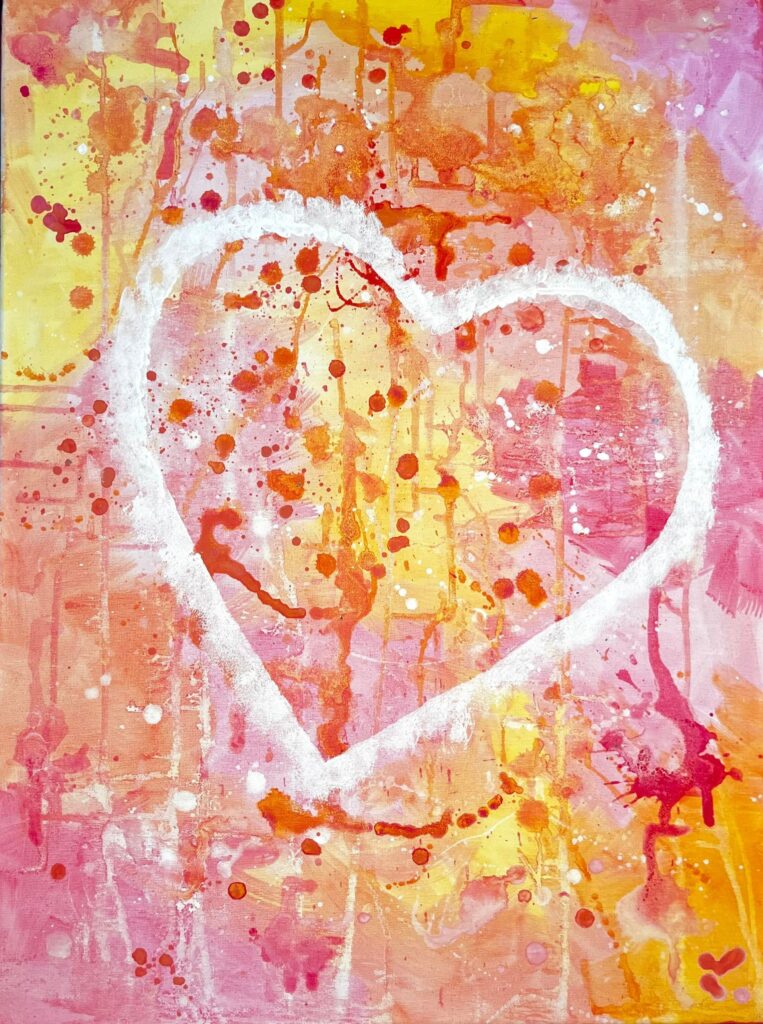
How do you celebrate Valentine’s Day? My favorite way is through arts and creation! I love to explore new ways to use the seasonal color schemes and shapes to make something fun, cool or pretty!
This year I had fun with abstract textures and bright colors! It was such a fun process that I decided to share it with you as a really easy project to try for Valentine’s Day!
To realize this painting, you will need:
- A fresh, new canvas;
- A paint brush (I used a flat one and a round one);
- Acrylic paint in colors that mix well together;
- Water;
- A paint palette or a plate;
- A sponge;
- A sheet of vinyl or a piece of cardboard;
- Scissors.
Explore The World Of Colors
First, let’s talk about your choice of colors.
I like to take two colors that mix well together to create other colors, and add white to the mix to create delicate, pastel like colors. For example in this video, I used magenta and yellow. With white, I was able to mix lovely hues and tints ranging from delicate pinks to peach, coral, bright orange, lemon yellow or bright fuschia.
If you decided to go with blue, yellow and white, you would be able to create a wide variety of blues and greens, mint, aqua, teal, chartreuse, lime, etc.
Blues and reds will yield purple, plum and burgundy, and if you add white to it, you will discover a world of mauve, lavender and berry shades.
You can also choose to use a monochromatic theme and explore all the different tints, shades and tones of that same color mixed with grey, black and white.
Preparing The Canvas
Once you’ve picked the colors you would like to have fun with, prepare your canvas by making really wet. Use your brush to cover it with water. Usually you would not want your canvas to drip with water but here we are mimicking the effects of watercolor so go for it!
It’s now time to paint your canvas with the color scheme you chose! Once again, make sure your brush is wet as you dilute some paint and use it pure or mixed with another color. Watch this video to see how I mix the different colors together and how I dilute them.
Brush Strokes, Drips, Splatters And All That Fun Mess
Then, attack the canvas! Use criss cross brush strokes to vary the angle and give some texture to your blocks of color. Layer the colors – let them touch and mix right on the canvas. Let the colors drip down the canvas, splatter it with your brush, or let it drip onto the canvas laid flat on a table or on the floor. The only limit is how much of a mess you can handle around you ha ha!
I usually like to end with some drips of diluted white paint here or there on the canvas. These touches of white, once dried, lighten up the canvas.
Once you’ve had lots of fun with your colors and your water. you have to let the canvas dry. It might take a few hours. Meanwhile, we will prepare for the next step.
Do you know how to cut a perfect heart shape out of a plastic sheet or cardboard? Here is a little tutorial to get perfectly symmetrical hearts with a minimum of effort 😉 Now use this newfound knowledge to cut a big heart that we will use as a stencil to complete our project. Just make sure it is the right size. You don’t want it to spill out of frame… But you do not want it too small either. Refer to the picture at the top of this article to have an idea of the size you are looking for in proportion to the format of canvas you are using.
The Finishing Touch
Once your canvas has had time to fully dry, you can now do the last step of the project.
Place your heart stencil on the canvas. You don’t have to fully center it, you can give it a tilt. It always makes it more pleasant to the eye if it’s not too square and center.
Use your sponge to take a little bit of undiluted white paint. Don’t overfill the sponge with it. It’s easier to avoid paint seeping under your stencil if you don’t use too much at a time. Lightly dab the white paint all around the stencil. Careful! Do not merely brush the canvas with the sponge. That’s basically just painting with a sponge. When you dab, you get a different texture that will look nicer for this project. It will make the white area around the heart look light and delicate like a mist or a cloud.
Once you’ve sponged around the heart with white paint, carefully lift your stencil. Back up a little to admire your work of art – Bravo! You have created a masterpiece! You can now hang your beautiful Valentine painting in a place of honor in your home, or you can offer it to somebody as a very personal and meaningful present.
Make sure to share with us your beautiful creations! Join our Lupton Street Studios Community group on Facebook and post a picture of your creation! Happy Valentine’s Day!